Build a Gamer PC - Building
May 7, 2016
Build a PC
1334 words, a 7 minutes read
Now that we’ve chosen our components and gotten them from the vendor, let’s build this thing.
Goals
I wanted to have nice cable management, I like keeping things clean, neat and properly set up. This means routing the cables through proper cabling holes instead of setting them up directly, and using modular cables only when I need them.
Building
The building order may not be the best, the case, PSU and the HDDs were just what I had gotten first.
Case and PSU
The case was fairly easy to unbox and that’s what I did. I recommend you keep the case package as a container for all the other cardboard you’ll be throwing away. You can even make compartments for other plastic waste, using the protective foam.
The PSU was just screwed to the downside of the case. I used the fan-down mode, so air is sucked from the outside, cooling the PSU and then going out nicely on the backside. Some recommend letting it suck air from the inside although I don’t really see the point in that, maybe someone can point it out?
HDD and Optical Drive
I uninstalled the 5x3.5” HDD cage since I don’t need that. I then mounted my 3 drives to the cage via a slot mechanism. I used the given rubber mounts to uncouple it from the case, meaning less vibration from the HDDs is transferred to sound coming from the case.
I then routed a 4 port SATA power connector from the PSU to the drives. Same with the SATA cables, 4 cables to that same spot. To get from the HDD compartment to the 5.25” drive cage, I used a SATA Data + Power extension and routed that from the HDD compartment up to the 5.25” drive cage
Motherboard and CPU
The next big thing is the motherboard, the CPU and its cooler. Note that I use a slightly different order than recommended, I installed the CPU fan inside the case. The reason for that is I like to have something I can press against when mounting the cooler, something I don’t wanna to without proper support.
I installed the CPU outside the case, using Asus’s CPU install tool. I don’t know how you could screw things up using this and by just following the instructions, everything went fine.
I then mounted the motherboard inside the case. The tools were quite nice. I installed the standoffs and then had a little tool to tighten down the standoffs. I then installed the IO shield and aligned the motherboard with the standoffs, with one pin protruding from the case’s backplate to help with that.
After tightening down the motherboard to the case (remember, it’s not an automobile, just tighten down until you feel reasonable resistance) I put the case back up again and installed the cooler. The instructions were very nice and I could install the backplate and the mounting brackets on the front with no problem. I then put on the thermal paste, after spending some of the last days figuring out what the best technique was. There is a nice video from LinusTechTips showing that everything but too much paste is probably fine.
Installing the cooler to the CPU was, again, straight-forward, Just put it center on the CPU and tighten down the screws. Best if you change a bit, so don’t put one screw completely tight but let it slide in place over time as you gradually tighten the screws.
Cabling-wise, the cables should be long enough to reach all the places but not too long so they’re lying around. Just install them nicely and let a surplus in cable length on the backside, you’ll clean that up later.
RAM
I then installed the RAM so I could finally get the board to a POST test (I got onboard video which is enough for this test). That was easy too since the CPU cooler was not blocking anything.
I then started the computer via the key on the motherboard (see why I like that?) and it posted! After a quick first setting in the BIOS though, standing still at POST 32 (memory initialization). I then pulled out each RAM stick and put it back in, showing that everything worked until I used all 4 slots. Knowing that it’s too late now to go to the shop and it’s probably just a BIOS problem, I went on with 3 slots, totaling at 24GB.
I later did a BIOS update and then tried again, everything worked.
SSD
Having never installed an M.2, I had a look at the manual and it’s quite easy. You just put it in the slot, see what holes are covered, install a standoff on the last one and screw it down. Done! Nice, and no cables lying around.
GPU
Now the behemoth and power house. I undid two of the PCI slot covers and installed the GPU in its slot. I then used two instead of one cables (with two 8 pin connectors) for increased stability, as the PSU manual recommended. Routing these to the back and using the middle slot I could actually make it RIGHT to the GPU. Not too hard, just right. I then tied the unneeded connectors to the cable to ensure it doesn’t get in the way of my CPU cooler fan.
Case Connectors
Being nearly done, the last thing were case connectors. You have fans which I recommend plugging into your motherboard to let them be regulated by your temperatures, instead of connecting them to the case where you just have a voltage control.
Then there are the front connectors. The USB ones are easy, you simply cannot put it in the wrong way. Then you’re left with those mini one-pin connectors which I hated for a long time because they were so fiddly to install. Asus gives you a little tool where you can install the pins to, probably on the outside where you have a bit of light and then install that tool to the motherboard pins. Problem solved!
Cable Management
So let’s take a look at the pictures above, but in a bit more detail
Front
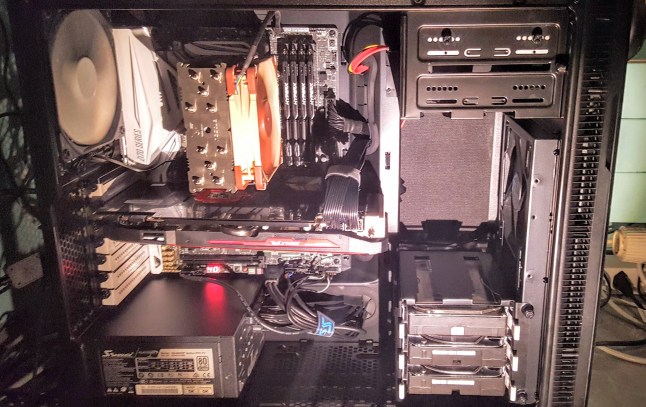
You can see that there are no cables blocking airflow. The GPU power cables are the only ones that are in the way but I see no other way of installing it nicely.
I tied all the case connectors together with Velcro to make sure they don’t lie around. I used Velcro instead of cable ties since I might have to modify something.
The case fan cables are made shorter and tied to the case with cable ties since I don’t have to modify them that often.
Back
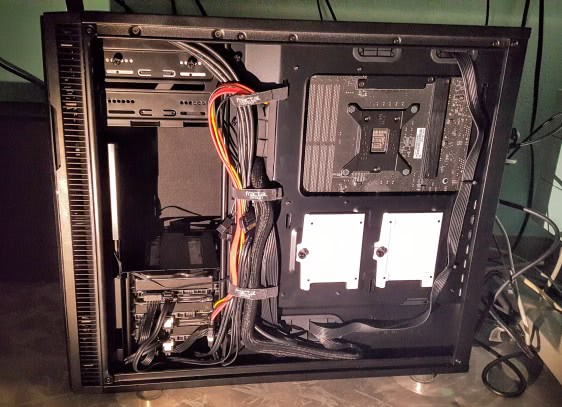
The back is where you could go with ugly cabling as it’s not the part that is often shown, but I recommend to keep it nice and clean as on the front.
You can see that I didn’t let cables float freely. Everything is supported and has its route. Also see that I made clear routes, in the middle to the top for almost anything, lower front corner for storage cables (also note the colored SATA extension cord) and the back for just the CPU power cable. I originally planned to route that cable with the others, but it would’ve gone across the CPU backplate which I didn’t like.
General tips
Get an ESD wrist band, seriously! Some say it’s not needed and they’ve done it several times without one, but there’s no doubt that it helps protect your components. Things may work properly for some time until something blows up and you have no idea what and why. You then think it’s a DOA even though you just killed it.
Don’t put cable ties on everything from the beginning. Use as much cable as you need inside the case and leave the rest to the back, take care of that when you’re done. Trust me, you’re gonna clip it again when you’re tightening it down too early.